byline

Paper models, photos and musings of a Paper Kosmonaut

02 April 2017

ZIL 4906 [10]: cranes and struts.

With finishing the cranes and the struts it's time to move on to another part of the build. I guess I'll do another wheel or so. I still have four to do, anyway.
However, to round up the build of the crane section, I'll show you what I did.
Firstly, I placed the secondary pistons on the arms. Next, the cranes needed some final detailing. Thirdly, I wanted the struts and jack posts to be functional. Here's how it all ended up, more on the story after the jump.


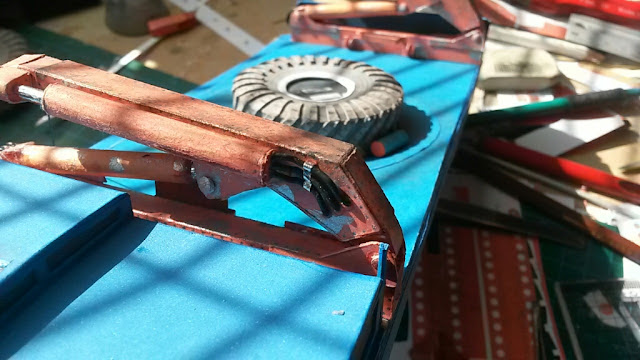
The cranes both are nice and dirty now. There also is a holder for the jack post support feet, 
just like on the real thing. Left, you can just see the strut peeping out of the shaft.
[EDIT]: I realised I didn't show you the secondary pistons I made for the top parts of the cranes. Here are some pictures.

Here's the piston, retracted.It isn't completely hidden, I guess that should have been the case but well, it's there and it looks good anyway.

And here it is seen extended. Now it all looks quite like the real thing. Although some of the trucks apparently miss these second sets of pistons. But no 4906 is the same. Now on with what I did to them. 
First, all four crane pistons needed some hydraulic tubing. it usually is black in appearance and I liked it that way too, although some 4906's seem to have them in the orange colour. I know I deviate a little from the original model and perhaps from my depicted number 87 but I have passed the point of wanting it to be exactly like number 87 anyway. there are too few pictures available to discern all of the details of this vehicle anyway.


I used thin flexible coated wire I bought in a model shop. It usually is applied in model rail roads. This stuff is so much more flexible than the regular electrical wire. It was easy to work with. This is the main piston, which unfolds the arm back over the deck.


Here it is after assembly. 
Three hydraulic tubes go from the base of the crane into the piston.


Both arms go their secondary pistons. I placed then just above the attachment point of the lower piston. The attach to the top of the extension arm and a double piston shoves out. They also got this hydraulics treatment. Here, I planned to let the tubes run alongside the arm to eventually disappear inside the arm.


 Like this.


Of course it needed some support on the arm itself to keep it in place. With some aluminium tape this was taken care of.


 Same for the other side, of course. I think it looks really cool.


Then, I realised from some photos that the jack post support feet weren't permanently attached to the jack struts but kept in holders that were attached to the base of the cranes. I redesigned the posts a little for this purpose. This meant using another print and creating a ring in which the strut would fit after extending.


Like this. The two separate struts move over each other. To prevent them from skipping off the lower strut part, I glued a small strip over the bottom of the outer strut. When the strut collapses, this strip shoves over the lower strut and keeps the two parts together. The wheels were just put there for measurement and for the impression as a whole. They are not yet glued to the vehicle.


Here you can see the strip over the struts and also that the lowest part of the strut is in an angle. This way, the strut is oriented 90ยบ in relation to the foot part and even is a little moveable to provide full support on uneven surfaces.


The struts detach from the feet easily, are lifted and flattened until they are parallel with the shaft of the crane.


Ten, you can shove them into their shafts carefully. This goes quite easily, even though the sewing pins I used for the axles are protruding a tiny bit. I cut them short and grinded them even further down to get them as flush as possible with the paper surfaces.


This is how they look when they are almost fully retracted.


Top view.


And a bonus shot from the rear crane. I also did the hand grips at the tail gate. Just metal wire painted matt black. The weathering (which I saw on the pictures, can be quite severe,) was done with pencil (brown and dark orange) as well as with acrylic paint (silver, gun metal and rust). Up next: your guess is as good as mine!
Well, I guess we'll see what it will be next time.
Thanks for reading!
--PK


No comments:

Post a Comment

attention spammers: all posts are moderated before placing.
you won't get through. you lose.